
Printalk
How to Replace Your Print Head in 6 Simple Steps and Avoid Errors
Aug
Estimated reading time: 5 minutes
Can I replace the print heads of my wide-format printer by myself?
It is a question often raised by graphic and signage companies because of the risks arising from this handling. But good news, there are simple steps to follow to prevent any risks and we will share them with you. Even though today’s large format printers are generally reliable, some preventive maintenance is strongly advised to maintain the quality of your prints, extend the lifespan of your printer and the parts that come into contact with ink. Print heads are obviously one of them and you should consider cleaning your head for better ink efficiency. But that will be addressed in a future print talk post with many stories to tell.
That being said, with frequent use, print heads tend to wear out over time or clog as small amounts of ink or dust dry up and collect in the nozzle. Streaky prints, banding colors and missing nozzle are some of the common signs of a clogged print head but you can usually solve it by performing one or two cycles of head cleaning. If your attempts fail it’s probably the time to replace your faulty print head. You may ask your service company to perform the maintenance but head replacement is a relatively simple operation and you can definitively save a lot of time and a considerable amount of money if you replace it by yourself.
Before getting to the point, note that we do not pretend to write a comprehensive installation guide but we want to share easy quick fixes and useful advices in order to avoid critical errors. These instructions are intended for Mimaki printers but most wide-format printer brands such as Roland or Mutoh work in the same way.
Replace Your Print Head in 6 Easy Steps and Avoid Critical Errors
1/ Discharge any Residual Static Electricity
This step is critical and non-compliance with this process could cause serious consequences to your plotter. It’s not something to be taken lightly. To prevent any static damage (ESD), you first need to discharge static electricity from your body before touching any electronic component. The next step is to ensure your printer is turned off. Pull the plug and wait at least 15 minutes before handling. You can also power on your printer for a few seconds (while unplugged) in order to make sure you get rid of any residual electricity or invest in static eliminator that you can easily find online.
2/ Clean Your New Print Head
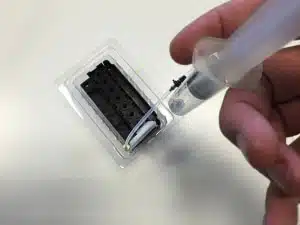 Water-based transportation liquid supplied in the head at the time of shipment reacts to solvent ink and may cause clogging. It’s therefore necessary that you clean the new head before proceeding to installation. This is the case for Epson print head (DX4, DX5 and DX6). In a clean environment, gently blow air on each channels of the print head then inject 5 cc of cleaning fluid at low pressure using a syringe and finally air again. Do not drown the print head. The liquid must be injected at very low pressure and must only drip from the nozzle. I don’t need to specify that head can be damaged if liquid is injected too fast.
3/ Keep a “Treasure Map” of Your Printer
Before getting your hand dirty, I strongly suggest that you have a deep look on how parts are assembled and take some pictures of the pandora box. Never tried to assemble an Ikea shelf like a man… without instruction guide? Yes, I think you got the picture. 😉 Don’t waste time understanding how things are put together. By the way, talking about treasure. In some circumstances, you will need to digit the head rank on your printer to activate the head. Remember to note it before it’s too late. On Epson head, the ID is usually printed on a with label and it consists of 24 characters (3 rows of 8 characters each).
4/ Remove and Replace
Remove the cover, the carriage cover and ink lines. As there are many ink lines containing the same color, it’s important to label each line as it is removed and you can also prevent ink drips by wrapping in a towel. Then, remove each damper (do not touch or push on the clear membrane as it may open the self-sealing valve causing ink drops), disconnect each FPC cable (by the connector not the cable!) and – finally – remove and replace the head carefully.
We strongly suggest to replace the flat cables at the same time as the print head. The reuse of the old cable may cause malfunctions or damage the head and some other components. I would rather spend a few additional euros than facing huge problems. For further details, please refer to your manual guide or feel free to contact us if you need any additional help… it’s free!
5/ Adjust Your Print Head Alignment
When the print head has been successfully installed but not screwed yet, try to move it from the inside to the right and tighten the screws. This helps to assemble it straight and avoids later mechanical alignment.
6/ Perform a Preventive Check-Up
Prevention is better than cure. While your printer is still open, run a check of the printer vitals. Look at the damper. If swelling or if you notice other anomalies, it is best to replace it. Before dismantling, also have a check at the functionality of the cap, pump and wiper so as to be sure that the new head works properly when the first ink is loaded. You are now all set!
Need any help to clean your print head?